Create TA Action Plan
The user needs to be logged in as a Primary Provider.
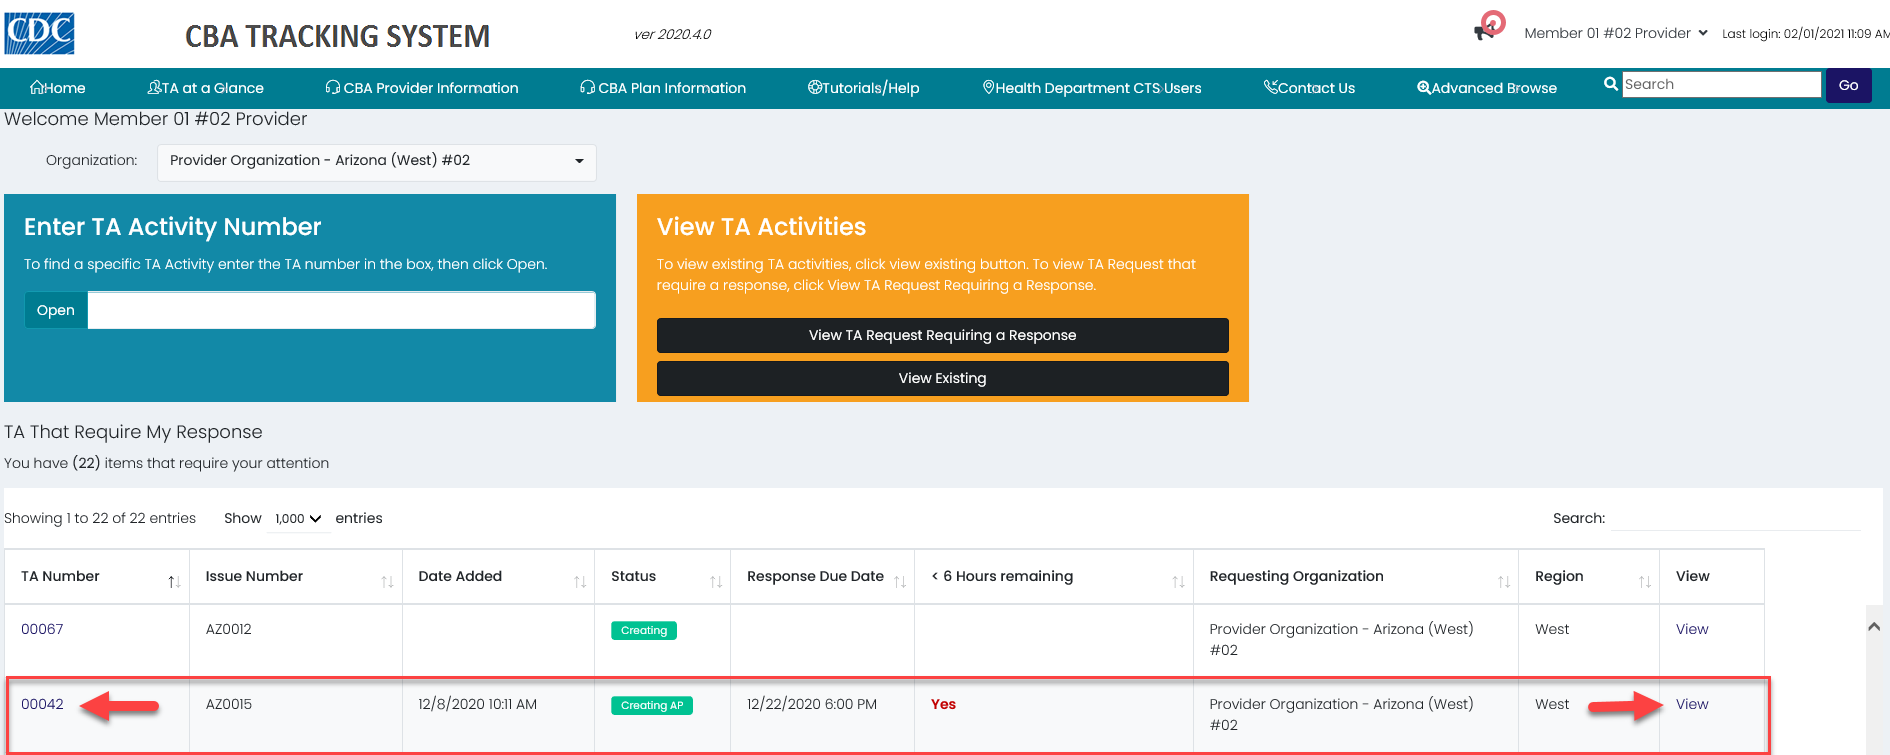
To access a request/activity in Creating AP status from the dashboard.


- In the TA That Require My Response section, locate the number in the TA Number column and click the number or the View link.
- The status is Creating AP.
- Another option is to enter the number in the Enter TA Activity Number textbox and click the Open button.
- Also, a request may be located by searching on any information listed under the column headers.
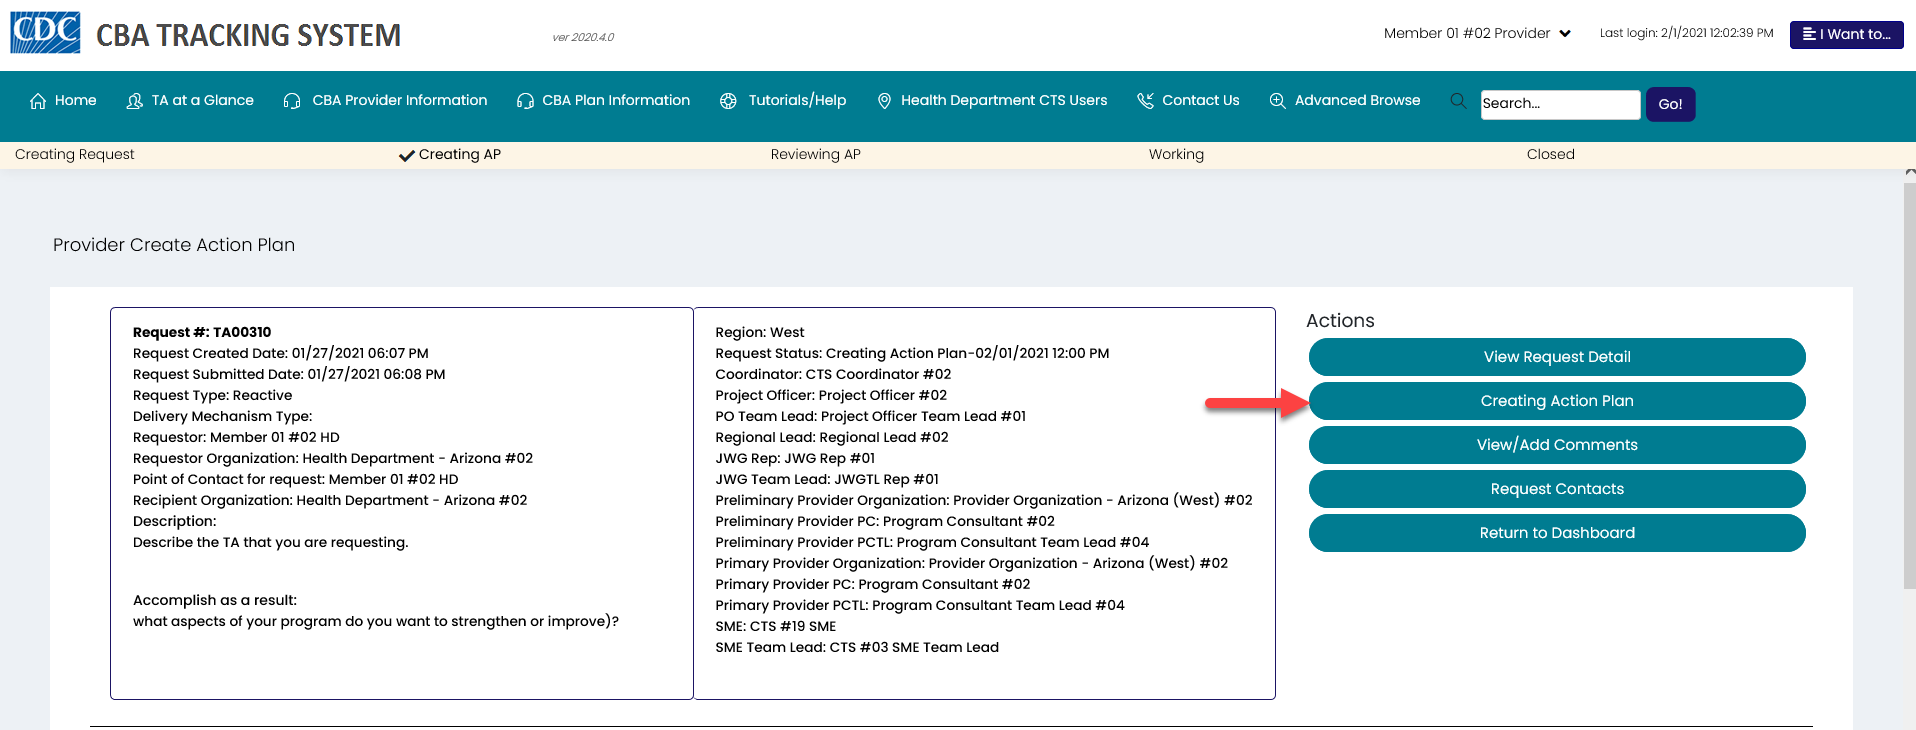
- The Provider Create Action Plan page displays.
Note: A provider can see all request/activities in their region. If the request/activity belongs to another provider, the Create Action Plan button will not display.


- Click the Create Action Plan button.
Note: The Create Action Plan button is located in two places. The button can be found under the Actions menu or you can scroll to the bottom of the page.
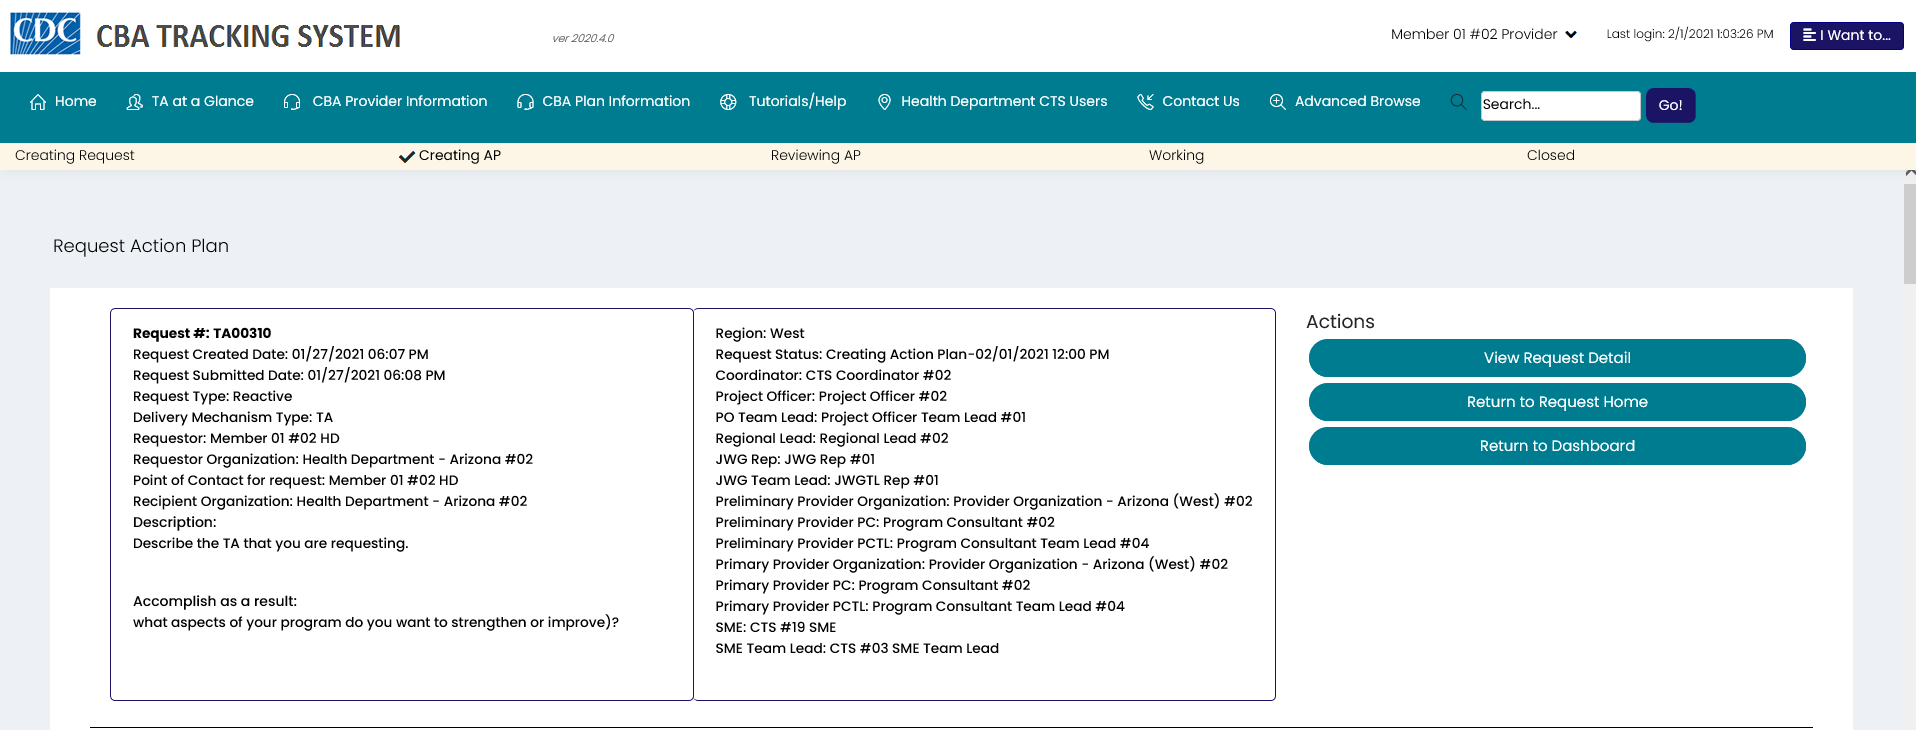
- The Request Action Plan page displays.


- Select the Technical Assistance (TA) option.
- Click the Save Action Play Type button.
- The categories for the Action Plan display.
Note: By default, all categories would be in the expanded view.

Logistics Information section

- Enter the logistic details and responsibilities in the textbox provided.
- Click the Save Logistics and Responsibilities button.
- A green checkmark displays next to the section name.

Note: The green checkmark will only appear once the section has been completed.
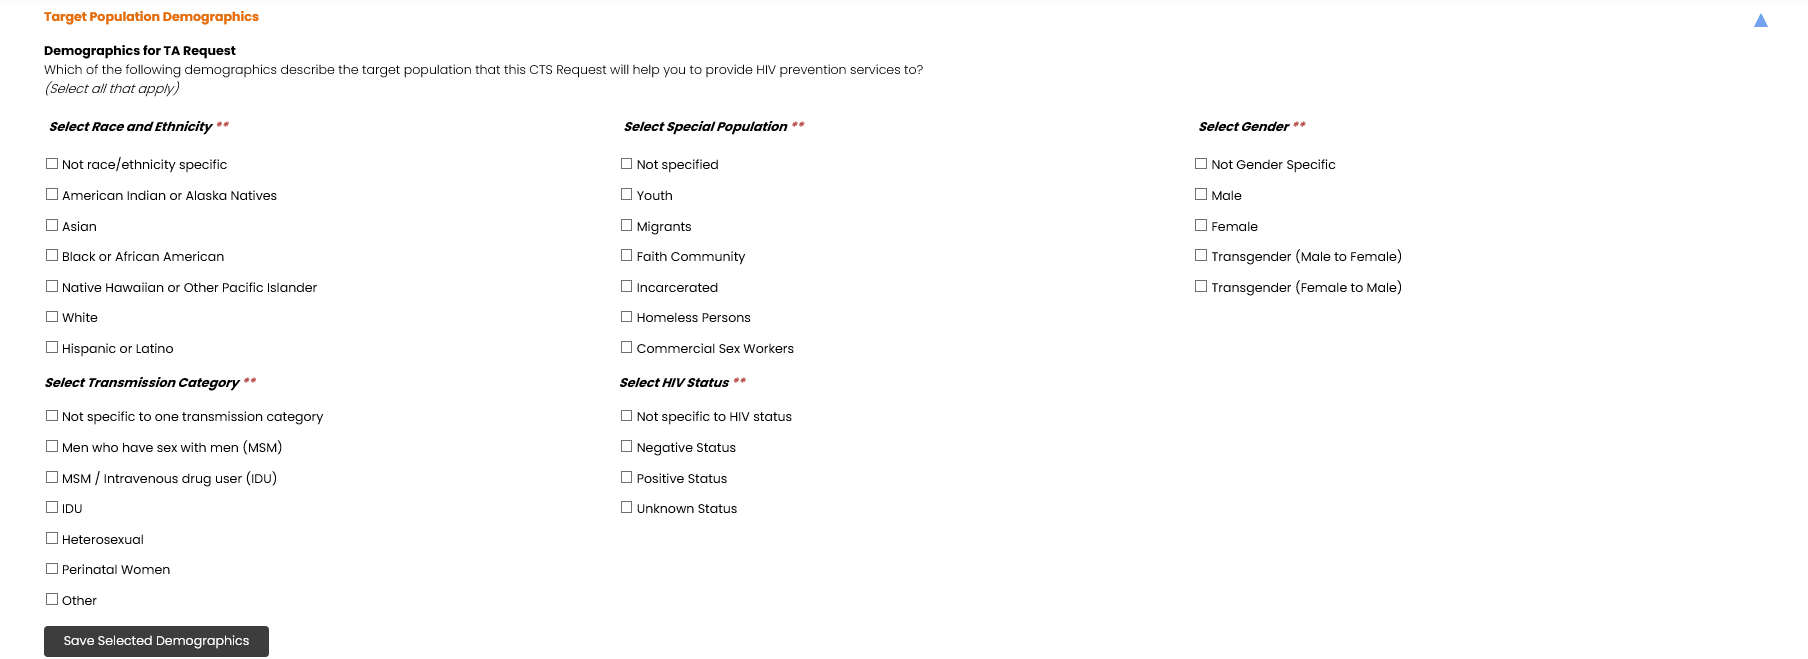
Target Population Demographics section

- There are five demographics listed in Target Population Demographics section; select at least one option from each demographic:
- Select Race and Ethnicity
- Select Special Population
- Select Gender
- Select Transmission Category
- Select HIV Status
- Click the Save Selected Demographics button.
- A checkmark displays next to the section name.

Delivery Mechanism section

- Select a Venue Type from the drop-down list.
- Enter the Estimated Number of Hours in the textbox provided.
- Select a date from the Estimated Start Date calendar.
Note: The start date auto-populates the Estimated End Date calendar.
- Select a date from the Estimated End Date calendar if needed.
- Click the Save Delivery Mechanism Details button.
Note: A green checkmark will display once the Delivery Mechanism subsections information has been saved (Objective, Activities and Deliverables; Delivery Mechanism’s Contact Information – For Providers; Manage Participants Role).
Objective, Activities, and Deliverables section

- In the Objective, Activities, and Deliverables section, add a comment in each textbox provided.
- Click the Save Objective, Activities, and Deliverables button.
- A green checkmark displays next to the section name.

Delivery Mechanism’s Contact Information – For Providers section

- Enter the delivery mechanism contact information.
Note: This section is for Providers. Enter contact information for the Providers staff person who will be the contact person for this request.
- Click the Save Contact Information button.
- A green checkmark displays next to the section name.

Manage Participants Role section

- Select a participant role and click the Edit # of Participants link.
- A textbox displays in the Estimated # of Participants column.

- Enter the number of estimated participants and click the Update link.

- The table updates. A green checkmark displays next to the section name and next to the Delivery Mechanism section.

Peer To Peer section

- In the Peer To Peer section, select Yes or No to the question displaying.
- Click the Save Peer-to-Peer Decision button.
- If the peer-to-peer question was answered Yes, the Select or Add Peer to Peer Organization button displays.

- Click the Select or Add Peer to Peer Organization button.
- Peer organization information displays.

- Click the Organization drop-down arrow to select an organization.
- Click the Display Organization button.
- The organization details display.

Note: If you want to change organizations select the Find a Different Organization button.
- Click the Add this organization as the peer CBA provider button.
- The added peer organization displays and a green checkmark displays next to the section name.

- Click the Save Peer-to-Peer Decision button.
- To delete the peer organization, click the Delete link under the Actions column.
Provider Collaboration section - Optional

- Click the Add Collaborating Provider button, if a collaborating provider is needed.
- Collaborating provider information displays.

- Select a Collaborating Provider from the drop-down list.
- Enter a comment in the textbox provided.
- Click the Save button.
- The Collaborating Provider displays.

Note: A checkmark does not display next to the section name because it is optional.
- To delete or edit the collaborating provider, click the Delete or Edit link under the Actions column.
- To submit the action plan, click the Finalize Action Plan button.
- The Submit Action Plan For Review section displays.

- Enter a comment in the textbox provided.
- Click the Submit Action Plan for Review button.
- Action Plan has been submitted for review. The status of the request/activity is now Reviewing Action Plan.
- Click the Return to Dashboard button.


![]()


